“B” Is For…
There are many factors that make up successful stock imagery. I noticed some time ago that there was a common trend among some of the highest selling stock images. This trend is not absolute, mind you. However, it cannot be ignored. For this article, I am going to focus on the rule of “B“.
Business
The general attitude toward this subject has become somewhat cynical. Some of the negative statements regarding business-themed stock imagery include, “The market is over-saturated with business images.” or, “It has become too cliché.”, etc. But the fact remains that busines-related imagery is still among some of the best selling subject matter. The word “business” ranks #1 in the top 40 most-used search terms for stock images. So, even though the subject seems overused and cliché, if you are looking to make a buck with stock images, don’t forget to shoot Business images.
Blue
On the subject of business-related images, take a look at the top-selling images and make note of the color scheme. Again, this is not absolute, but there is a definite trend worthy of taking notice of. You will notice the color blue makes an appearance over and over again. Many images have been “cooled down” in post processing to give a general appearance of being in a cool, pleasant setting. There are many theories regarding the popularity of the color blue in advertising. I read once that blue became popular in print advertising, because blue was one of the cheapest colors of ink to use in the print process (I have yet to find any hard facts to back up this theory). Other theories suggest that blue is a calming color, pleasing to the eye. You can read an interesting article here that explains various theories as to the popular use of blue in advertising. Basically, my point is don’t ignore the popularity of blue. Experiment with working the color into your compositions, along with neutral tones like white, gray and black.
Bright
Another trend that is noteworthy is how popular photos are usually bright and flooded with light. With regard to the business theme, for mass appeal, avoid overly-dramatic shadows and dark backgrounds (unless you’re going for a dark serious mood). Light, bright and happy sells photos… lots of them. I’m not saying this is ALL you should shoot, but you are more likely go garner a few extra sales if you stick to a positive tone.
Beauty
Now, I personally have a problem with photographing nothing but beautiful people. There is a trend growing, thankfully, to use “ordinary” people in advertising. However, take a look at some of the hottest-selling stock images. You will commonly see photos that include either attractive 20-somethings or fit, healthy and attractive mature adults. This is another trend that cannot be ignored.
Bokeh
Simply, bokeh (pronounced “boquet” by a large portion of the photography community) is the aesthetically pleasing use of blur, in either the foreground or background, to help draw attention to the subject. Many very successful shots of businesspeople will show heavy use of this, blurring things like windows, hallways, coworkers, etc. in the background. This blurry background becomes a handy canvas for designers to insert additional elements into their final design (also referred to as copy space).
Putting My Money Where My Mouth Is
Lastly, I would like to share with you the processing method to one of my business photos. In this example, I have kept the processing as simple as possible. All of the major tweaks have been done in Adobe Camera RAW 8.1, as part of Photoshop CS6.
Let’s take a look at the original image..

Now let’s look at the adjusted photo, paying attention to the various adjustment tabs…
Step 1: Adjust color temperature, exposure, contrast, highlights and shadows:

Step 2: Adjust sharpening and noise reduction (Luminance and Color):

Step 3: Adjust hues (in this case, I only adjusted the Oranges):

Step 4: Adjust saturation levels (in this example, Red, Orange and Blue):

Step 5: Adjust luminance levels of color channels (in this case, Reds and Oranges):

Step 6: Apply lens correction profile to correct lens distortion and straighten architectural lines in the background:

Step 7: Apply chromatic aberration removal filter to reduce the appearance of color fringing in areas of high contrast:

Step 8: Open the image for editing, then, from the View menu, select Show Grid:

Step 9: Duplicate the background layer and select Edit -> Transform -> Distort to straighten the image, using the grid as a “straight edge”:

Step 10: Flatten image and do basic blemish removal with patch tool, cloning, etc.:

That’s it! The photo is now ready to upload.
Let’s review my application of the Rule of “B” in the above photo edit example…
Business – check
Blue – check
Bright – check
Beauty – check (subjective, I know)
Bokeh – check
Now all I have to do is sell a few copies to prove my point! Wish me luck. 🙂
A Little Bit of Preparation Goes A LONG Way!
It’s a little ironic – I got into photography because of an interest in working with Photoshop. After a decade of fixing and beautifying photos for my stock photo portfolio, not only am I tiring of Photoshop, but I have come to learn that spending a little extra time doing some prep work with models and props saves a LOT of post processing time. Every “brush stroke” in Photoshop takes time.. precious time that could be spent doing absolutely nothing. Let’s say that during a shoot, you take 500-1000 photos. Of those photos, let’s say 30 of them make for viable stock photos. If you have to spend 30 minutes per photo cleaning things that could have been addressed prior to pressing the shutter button, that equates to 15 hours wasted, staring at your computer screen.
Electrical tape is a great time-saving tool when it comes to hiding obnoxious logos. The tape comes in many colors, and the seams between strands of tape are MUCH easier to fix in Photoshop than the logo it hides. The photo below is one example of how I used red and white electrical tape to hide logos plastered all over the motorcycle. Had I not used the tape, I would have spent an hour or so PER PHOTO doing logo clean-up. Instead, I spent maybe a minute or two cloning out tape seams.

Prepare Your Models!
Another time saver, both during a photo shoot and after is to make sure your models are properly prepared and ready to go when it comes time to shoot. Don’t be afraid to communicate what preparation you require. Personally, I don’t like spending extra time in Photoshop giving virtual manicures, so one thing I ask of them is to make sure they pay special attention to their fingernails prior to shooting (cleaning off old nail polish, clipping nails for the men, applying cuticle oil to dry/cracked cuticles, etc.). It’s just one small thing among many that will both save you time and make your photos look better under scrutiny. For a more complete list of things I ask of models prior to a shoot, you can view the document here.
I have a basic philosophy when it comes to producing stock photographs. The end product is for the customers – NOT the photo inspectors. If you are doing the bare minimum to get photos to pass inspection, then you are doing both yourself and the customers a disservice. So, do the little things – iron clothing, use a lint roller excessively, keep a bottle of lotion on hand for dry skin, invest in a bag of disposable combs, buy a bottle of cuticle oil, buy a variety of colors of masking and electrical tape, etc. Less time in front of your computer = more time with your camera = more photos to upload. Or, even better, it might mean more quality time with the ones you love.
Let Your Camera Be Your Teacher
Do I Need a Light Meter?
I have gotten this question enough times to warrant a blog post on the subject. The short answer – NO. Here’s my take on light meters – they were an important cost-saving tool in a time when film cameras ruled the industry. Film was expensive, so it was important to get the lighting and camera settings dialed in BEFORE hitting the shutter release. Now that we have evolved to the digital age, film (or the lack thereof) has become much less expensive. Now there is nothing to lose by snapping a few test shots to see what the results look like on the camera’s LCD screen, making a few tweaks to lighting here and there until it “feels” right. My basic philosophy is that a good photo is defined by the emotional response it elicits – not by the numbers on the dial. I don’t own a light meter, and, at this point, I don’t think I ever will.
Automatic Mode is Not Completely Evil
I laugh to myself when I hear photographers go on about how they NEVER stoop to use automatic mode on their camera. Whatever. Well, I DO – not always – but there are times when it comes in handy. I rarely agree completely with what settings the camera chooses in Auto (or Program) mode. However, sometimes the Automatic settings make a nice starting point in the tweaking process. I will use the photo below to illustrate what I mean:

I took this photo a little over six years ago, when I was still experimenting with my strobes in various location settings. I don’t consider the shot one of my best, but it does make a decent example for explaining how I used one of my camera’s Automatic modes to figure out what camera settings I needed to use. All I wanted out of the shot was to have the foreground lighting (a single strobe fitted with an umbrella) balanced with the background. Since I had no control over the light in the background, I would start by figuring out the best settings in the camera to properly expose that (the background). I had two settings in my mind that were set in stone – I knew that I needed to set my ISO at 100 (anything higher on that particular camera would have resulted in too much noise), and I couldn’t use a shutter speed higher than 200, because that was the max sync speed for the strobe I was using. Basically, all I wanted to ask the camera’s “opinion” of was the f-stop setting. So, before posing the models, I set the camera to Shutter Priority mode with a shutter of 200 and ISO100, then aimed the camera at the scene that would serve as the background of the family and snapped a photo while observing what f-stop it chose. The camera chose f10, and the cityscape looked perfectly exposed, so I ran with that. I switched the camera to Manual mode and dialed in the settings Shutter 200, f10, ISO100. Now all I needed to do was to insert the family into the scene and aim my single strobe fitted with an umbrella in their direction. I snapped two or three photos while moving and adjusting my light to get the exposure I liked, and then I was off and running. Piece of cake. Nowadays, I wouldn’t even use a strobe in that setting. I would rather ask a friend to assist with a simple reflector to bounce some natural sunlight in their direction. But, at the time, I thought it was fun to experiment with the strobe.
Over time, I have built a mental library of camera settings that work in different lighting scenarios. This is partially attributed to the fact that I paid attention to what settings my camera was choosing in Program mode. Many times, it was a matter of learning what NOT to do. I will probably get some disagreement on this, but my last camera was a great learning tool for what NOT to do – the Canon 5D Mark II. It seems like every time I asked that camera to pick a setting, it was always the wrong one. I hope whoever was responsible for designing the logic chip for Automatic modes in that camera got fired. That is one camera I can honestly say I never relied on Program (Auto) mode. Horrible. I eventually ditched that camera and upgraded to the Canon 1DX. The beauty of that camera is the fact that I can manually set my aperture and shutter speed and let the camera pick the ISO. I have shots from that camera where the Auto ISO chosen rose above 3000 and the shot is less noisy than many ISO400 shots I’ve seen from other cameras. It’s a thing of beauty.
The basic moral of the story is the fact that the Automatic (or Program) modes in your camera can be an excellent learning tool. All you have to do is pay attention to what the camera is doing and make a personal decision as to what needs to be adjusted to make the shot perfect for your taste. It’s that simple!
Get Out of Your Comfort Zone!
This is a topic that has probably been beaten to death by other blogging photographers. I’m here to tell you it’s not just pithy advice, as you might hear from some fly-by-night motivational speaker. If you intend to grow as a commercial stock photographer (or any type of photographer, for that matter), then you really need to experiment with shooting subjects that are outside of your normal routine. It’s somewhere in the same ballpark as the “Do one thing every day that scares you” type of advice.
Recently, during my trip to the Los Angeles iStockalypse™, I had the pleasure of meeting a fellow photographer, Stella Levi, who also happens to be a superb graphic designer. We talked at length about the process of approaching strangers to ask them to model for stock photos, which was something outside of her comfort zone. Much of what we discussed served as the inspiration of my previous post about finding and working with models. Several days after my return home from the event, I received an email from her explaining how she took her first step to approached an attractive couple on the beach to model for her.
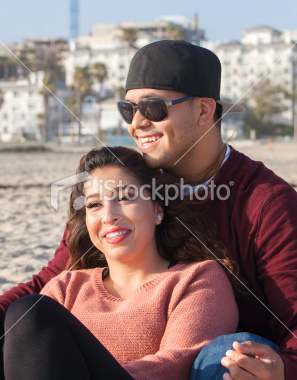
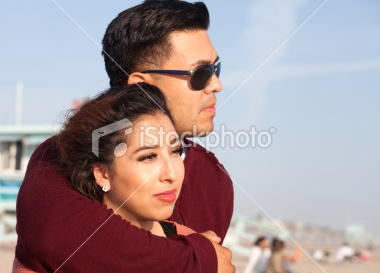
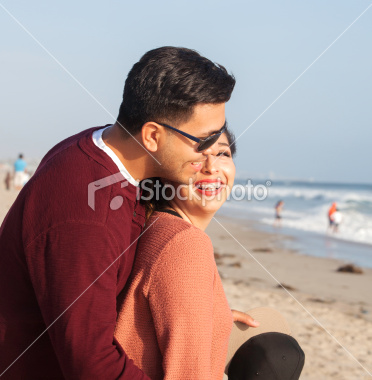

I was extremely delighted to see the resulting photographs! Not only are they very well executed, but it was an exciting step in a new direction for an experienced graphic designer in the world of stock photography. Her approach in presenting herself as a stock photographer to total strangers and making arrangements for them to model was perfect. From the look of the photos, the models seem perfectly relaxed and appear to be having fun. Hopefully this is the beginning of many more fantastic shoots from Stella. I’ll definitely be checking back with her to see what she’s up to!
Food for thought: one thing I do, just for practice, is to ask permission to shoot at a location where I might never plan on shooting. For example, if I stumble upon a flower shop that might make for a nice spot to take photos of a model playing the role of florist, I might strike up a conversation with the store’s owner or manager to explain what I do for a living and what a great backdrop their shop would make in photos, handing them a business card in the process. If they appear interested or receptive to the idea, then I will usually proceed in asking what kind of arrangement could be made to use a small portion of their space at a future date for about an hour to capture photos. Often, they just smile and ask to give them a call a day or so before the shoot so they know when to expect me. Often times, a copy of the photos from the shoot is all they want. Sometimes I’ll get around to calling them to solidify a shoot date. Sometimes I don’t. At the very least, I keep their contact info for future use. It’s just one exercise I do to maintain my interpersonal skills.
But What if They Say NO?
Answer: So what? It’s the experience that matters.
Working With Models
Since I started shooting stock photography in 2003, I have evolved into a people-only stock photographer. I get quite a few questions regarding every aspect of the process of working with models.. where to find models, how to compensate them, etc. It’s about time I share some valuable information in a public forum. So, here we go..
Why
Why work with models? The answer to that is simple – people images sell. Mind you, the best selling people images are those kept in some sort of context – lifestyle, emotion, occupation, age group, fashion, social interaction, family etc. I have other personal reasons for preferring to work with models. The interaction during the shooting process is fun. Also, while shooting, I can ask a model to take a step to the side, sit, stand or emote. Try doing that with a goldfish or a bowl of fruit!
How
I often get the question of how/where I find my models. Remember, “models” are simply people. They are everywhere – online and in person. I have found models through modeling websites like Model Mayhem (http://www.modelmayhem.com) and Craigslist (http://www.craigslist.org). Some of them I have simply encountered while out and about, running errands, in line at the grocery store, ordering coffee at Starbucks, eating at restaurants, or even while location scouting for an upcoming shoot. If you have the stock photography bug (or sickness), then you will see potential models everywhere.
How Part II – The Trick
One of the funnest ways to recruit new models, in my opinion, is in person. Feedback is immediate, and the model-to-be gets to see first-hand who they will be working with. For this method, it’s a good idea to always have a business card handy. Approach the person and apologize for imposing or interrupting them. Tell them you’re a professional photographer and explain that you noticed something about them that drew you to introduce yourself (maybe you noticed their fabulous hairstyle). Pay them a due compliment and ask if they have ever done any modeling before. They will probably laugh, thinking that you are feeding them some sort of line. Be aware of this response before you enter into the conversation. Pull out a business card and hand it to them, explaining that you are a commercial stock photographer and you make a living from capturing photographs of real people to be used in commercial applications (like advertising), then ask if they would be willing to discuss an opportunity to model for you. It is at this point that the door will either open or shut. If they say, “No, thank you.” and the door shuts, just smile and say thank you and that you just had to ask (I have gotten this response a surprisingly low number of times). Once they have your card, they can always look you up online to see for themselves what the heck you were talking about, even email you later if they have questions or a change of heart. If the answer is YES, then you have a whole new set of questions to worry about – what is the subject matter of the photos (probably the first question they will hit you with), when (how soon) do you need them to model, where do you plan on shooting, and how do you plan on compensating them. You must have answers to all of these questions before you approach them.
Note: if you have found any of your photos in action, it always helps to have samples on hand to show. Picasa is a great tool for creating a web album of images “in action”. It will allow you to show them off in person (with a smart phone), or share them via web link.
Compensation
This is probably the trickiest bridge to cross when hiring new models. Compensation can range anywhere from copies of the photos (also referred to as Time For Print, TFP, Time For CD or TFCD) to an hourly pay rate. Before considering how to compensate new models, have a down-to-earth conversation with yourself. Answer a couple questions about how well your photos are selling and how well you expect photos of a new model to sell. Maybe you have a set of real estate photos that are selling well, so you want to “add another log to the fire” by adding some Realtor photos to your portfolio. Maybe you don’t have any shots of any models in your portfolio, so you’re trying to branch out. You need to keep all of this in mind when hiring a new model, because quite frankly, you are assuming all the risk. The photos might do well, or they might flop. If all you can afford to do is pay the model with a copy of the photos, then spell that out up front, in the very beginning. If you think they photos might fetch a couple hundred dollars in the coming months, then offer to pay them something like $25/hour for a couple hours for their time, plus maybe a copy of the photos for their modeling portfolio or scrapbook. If you’re highly confident that a particular theme photo shoot with their face will sell, then pay them accordingly. One thing to keep in mind is that there is an upper limit to all this. The most I have ever paid a professional model, represented by SAG, was $187.50 per hour. So, if you hire a rookie model, then you should set their expectations accordingly. $50 – $75 per hour for an amateur model with commercial appeal is not a bad place to start. If their photos sell well, then don’t hesitate to reward them a little more for a follow-up shoot. Feed their ego, but at the same time, don’t unnecessarily drain your bank account.
Be Honest
When communicating with models about setting up a shoot or compensating them, it must come from a place of sincerity. The model must have an idea of how you build your budget and some ballpark estimation of what you expect to get in return (you can be honest here in telling them you don’t expect much in return.. especially in today’s stock photography climate). The model must know you’re not looking for a date (if you are, in fact, looking for a date, then you’re on your own). They must also have a clear picture of your creative intentions. If you can’t convey any sort of idea about what type of photos you’re trying to capture with them, or explain in any certain terms what’s in it for them, then you need to consider the possibility of a no-show on the shoot date. If you are having problems with models “flaking” on the day of the shoot (or simply not showing up), then you probably need to look at the situation from their perspective. Imagine some questions you might have of a photographer if you were in the model’s position:
What is the exact theme of the shoot?
What am I expected to bring with me and/or wear?
What am I getting in return?
What time am I supposed to arrive and what time will the shoot wrap up?
Am I allowed to bring a friend?
Be Professional
Even if your photography is not currently paying your bills, you need to act as if it is. Don’t be afraid to let models know you have a budget. Also, don’t be afraid to tell them exactly what you need of them to create the right shot. Always look them in the eye while talking to them. Be friendly, but don’t cross boundaries. Respect their personal space. Always give them feedback during a shoot. Show them shots on your camera’s LCD screen during a shoot, explaining to them what you do and don’t like. Give feedback nicely and always pepper in compliments, even if you hate the way they’re standing. If you relax and laugh, the model will also relax.
In summary, the more information a potential model has about the creative process, how they will be compensated and how their photos will be used, the more likely they will want to work with you. Always be crystal clear when communicating your intentions and expectations. Also, it never hurts to have fun in the process.
Additional Resources
Here is a link to a document I send as an addendum to potential models I have found online (i.e. Model Mayhem). Feel free to copy and edit it to suit your personal taste. In any event, it is a good idea to set ground rules early and give new models a little help in the expectations department.
The Little Things
Don’t Miss a Moment
Here’s some advice I need to take for myself. Don’t forget your camera when you leave the house, and for crying out loud, LOOK AROUND! I have become quite adept at ignoring this advice, after years of preparing for “just the right shot under the right circumstances.” Many times life offers up little moments that work well to convey a message in the context of stock photography. Let’s be clear – I’m not suggesting taking photos of everything you see around you, expecting to make a fortune from submitting shots of power lines and bugs on flowers to your portfolio. Rather, look for truly interesting and remarkable moments. They are everywhere. You just have to notice them.

iStockphoto File #24685929
The above photo is a prime example. The image, from a recent iStockalypse™ event in Los Angeles, was taken by photographer Donna Coleman. Of all the photos that came from the event, this one is a personal favorite. I tip my hat to Donna for breaking away from the crowd of photographers, who were all focused on shooting the same subject at the same time. She decided to look elsewhere and noticed the interaction between these two dogs, then decided to take a moment to talk to the owner. Her short conversation uncovered the fact that the two dogs frequently exhibit this cute and quirky public display of affection, so she took a moment to capture it. Brilliant! Even better is the fact that of all the hundreds of similar photos that were produced during the event, her photo is truly unique. Am I jealous? You bet! But I am also inspired. So, thank you, Donna!
Exposure – Over or Under?
I don’t want to get into a bunch of tech talk about the histogram and all the science behind it, because, frankly, I don’t use it every day (or ever for that matter). Rather, I would like to speak from practical experience and show first-hand examples.
The debate as to whether over or under expose images is an old one, so I don’t want to beat a dead horse. For those of you who are new to the game and wonder which is better, the short answer is to over expose. If you want to read a good article and tutorial that talk about the nuts and bolts of it all, you can read about it here. For those of you who want the short answer, it goes something like this: details of an over-exposed image are much easier to recover than details in the shadows of an under-exposed image. When you have to crank up the levels of an under-exposed image, you introduce much, much more noise. When you put this in terms of shooting for stock, excessive noise = rejection.
In a nutshell – shoot RAW and over expose without completely clipping the highlights (or pushing the histogram too far to the right). A simple way to see if you’re clipping your highlights is to turn on the exposure warning of your DSLR. The exposure warning feature will make your clipped highlights blink either black or red in the image preview on your camera’s LCD screen. This feature also comes in very handy when you’re doing isolated-on-white shots. I use the exposure warning to show me that the white background is, in fact, white.
Not So Fast on The Delete Button!
Speaking of the exposure warning feature… if you’re shooting outside on a bright, sunny day and your subject is wearing a white shirt, you will probably notice quite a few shots where the image preview is blinking all over the place. Don’t let this scare you too badly, because it doesn’t necessarily mean your photos are ruined. The exposure warning errs on the side of caution, so there is usually image data to be recovered in those blinking areas. I have recently gone back to photos several years old that I originally thought were a lost cause, just to see what I was able to recover. The results were startling!
I ♥ Nik
I mentioned in my previous post that if you haven’t tried Nik Color Efex Pro, you’re missing the boat. Believe me… this is true. While I know it’s true you can achieve everything the Nik filters do by becoming a master of the Levels and Curves sliders in Photoshop, there’s something to be said for the ability to get the same (or better) results by clicking a couple of buttons. We’re talking easy peasy!
Here’s a photo I just completed (uploading to iStock as I type):

I know, I know.. the horizon is wonky. Never mind that; I think the photo will sell anyway. What I’m focused on is how much of the detail I was able to recover in just a few minutes of editing, and I did it all with Nik Color Efex Pro 4. Here’s the short list of filters I used, in the order I used them:
Dark Contrast (recipe downloaded from Nik website)
Fim Effects
Pro Contrast
Cross Processing (L03 and L05)
Tone Darken Indian Summer (recipe downloaded from Nik website)
None of the filters were applied at 100%. In fact, most were applied sparingly to avoid an “over processed” look. But if you compare the before and after, you might think the “after” looks over processed. It’s a simple matter of opinion. The trick is to use your own best judgment and play, play, play!
One last tidbit of information I would like to share in this post is camera settings. The camera used to take the above photo was a Canon 5D Mark II. The settings I used were: Manual Mode, Shutter Speed 200, ISO 100, Aperature 8, Exp Comp +0.7. However, for later shoots, I adjusted my settings for the same conditions. What I found worked better for a highly-dynamic shooting environment (i.e. lots of motion and movement by both myself and the model) was this: Manual Mode, ISO 320, Shutter 320, Exp Comp +0.0, Aperature 11 or 13 (depending on brightness of light).. so all I do is switch my aperature back and forth depending on the brightness of the shot. In the end, what I get from the revised settings are a much larger usable set of photos – less motion blur and very acceptable noise levels.
Enjoy!
The “P” Word
Well, I think three years is long enough to wait for another post! Did I mention I’m not much of a blogger? The strange thing is, I actually enjoy writing. Anyhoo…
I’ve gotten some really good questions regarding Photoshop. What’s too much? Too little? These are actually very difficult questions to answer, because anyone you ask will give you a different answer. I’ve been accused of over-processing my images. I’ve also been accused of not doing enough. It took years of practice and countless rejections to finally find my groove and realize an opinion is just that – an opinion. But my work is also constantly evolving. Photos I edited two years ago, during my hay day, look terrible to me now.
“No great discovery was ever made without a bold guess.” – Isaac Newton
The only real advice I can give is to pay attention to the basic elements: focus (or sharpness), noise/jpeg artifacting , fringing/chromatic aberration (or CA) and quality of light. Everything else takes back seat to these things. Before tweaking the general appearance of a photo – color saturation, levels, toning, etc. – ask yourself the basic questions:
Is there excessive noise or jpeg artifacting anywhere in the image?
Are all the important parts of the photo in focus?
Is there color fringing in any of the areas of high contrast?
Is the quality of light right (no direct flash, overly-harsh highlights or distracting shadows)?
If you can honestly answer “no” to all of these questions, or at least confidently address any of the issues, then proceed with experimentation. Play with filters you’ve never played with before. Make a photo look grungy, just for fun. Experiment with cross processing. If you wind up with something that you think looks really cool, then inspect the photo one more time, very carefully, at 200% magnification… or higher. If the answer to all of the questions above are still No, then you might be looking at a viable submission.
Pictures speak louder than words, so I’ll share a before/after sample from a recent shoot of my own. I wanted to create a mood for this photo that felt gritty and cold, so I tweaked the color and detail levels until the photo “felt” right. Through the whole process, I constantly ran the checklist of questions through my head, double and triple checking them to make sure the basics looked right. The photo is in focus; the edges look clean and free of CA; there is no excess of noise in the dark areas; and lastly, I like it!

Whether I will still like it a year from now is another story. 🙂
The short answer: Have fun and learn from your rejections!
One final note: If you haven’t tried Color Efex Pro by Nik Software, you are missing out! This is one of the very few Photoshop filter suites out there that is actually worth the money.
Lighting – Scratching The Surface
Lighting
I joke that the three Ls of photography are Lighting, Lighting and Lighting. The truth of the matter is, it’s not really a joke. Lighting will make or break a shot, no matter what camera you shoot with. There are countless articles and books written on the topic, and many of them may as well be written in Greek. I’ll confess right now that I’ve never taken a photography class, much less a class in lighting. My methods come from experimentation and observations of the natural world. The funny thing is, the more experience I gain, the less I feel I really know. What that means is this – the more I learn about lighting, the more I realize how infinite the possibilities are. This is a good thing. The means I have come to understand that the only limitation for creative lighting is the extent of one’s imagination (and maybe budget).
Technical Schmechnical
The hard part, at least for me, is deciding HOW I want the subject lit…. Soft light? Hard light? Hard shadows? Soft shadows? No shadows? Some combination of all the above? Once you know how you want it to look, the rest is child’s play. I honestly think this is where many other photographers get stuck – the creative part. Once you know HOW you want the subject or scene lit, the technical details are simple to figure out.
There are MANY tools for shaping, reflecting, diffusing and absorbing light. I like to relate studio lighting techniques to what Mother Nature creates during the course of any given day. For example, I think of a single bare strobe as the sun. If I want clouds, then I can add an umbrella or soft box. The bigger the umbrella (or soft box), the cloudier the sky. If you’ve ever taken photos outdoors in bright sunshine, then under cloud cover, this is an easy comparison to understand. Digging a bit deeper, the larger the light source, the softer the shadows; the smaller (and brighter) the light source, the harsher the shadows and highlights. When you put an umbrella or soft box on your studio strobes, what you are essentially doing is making your light source LARGER. Here’s a hint – you can also change the size of your light source by moving the light closer to or farther from your subject. A single bright spot of light far from the subject will create bright highlights and hard, sharp shadows… just like the sun on a clear sunny day. A large umbrella positioned just a couple of feet from the subject will bathe the subject in light and create extremely soft wrap-around shadows…. just like a bright overcast day. Get the picture? Now, this might seem like an over-simplification. But if you stop and think about how many variants there are on this one aspect, you will realize the possibilities are infinite. It really is “painting with light”.
One Light, Two Lights, Three Lights, Four..?
How many lights does it take to create the “perfect shot”? It would be easier to answer how many licks it takes to get to the center of a Tootsie Pop. This goes back to answering the harder question of HOW you WANT the shot to look. This question is so difficult, because there is no right or wrong answer. Here are a few examples of what I have done in terms of how many lights went into creating the shot:
One light:

Two lights:

Three lights:

Four lights:

Five lights:

No lights (well, ok, natural light):

That last shot reminds me of everything that goes into thinking through a shot using natural light. The girl standing in a wheat field took two solid days to create (three if you count drive time). The setting was hand picked after about 200 miles of driving around, location hunting. I visited the same sites in the morning, afternoon and evening, paying close attention to the position of the sun at the different times of day. I wanted the model’s face to be lit with low-hanging sunlight, and I wanted the landscape to be expansive. I also wanted the sky to be blue, and I wanted a breeze to be blowing her hair, dress and white fabric. Taking all these things into consideration accounts for all the time it took to get the shot. That shot exhibits more luck than skill, because everything did line up just right. But it helps to illustrate the concept of CAREFULLY picking the elements in the shot, as well as paying close attention to the setting/background. Finding the right model for the shot is another story!
Eventually, I will get more detailed as to the type, positioning and distance of each light for various set-ups. At best, this post is only scratching the surface. The best thing I can recommend is to PLAY. Start with one light. Move it around the room. Move it closer. Farther. Use an umbrella. Take the umbrella off and point the bare umbrella reflector at the ceiling. Let your gut and your emotion drive the look of the shot and don’t worry so much about the formula. You will eventually develop a style that is all your own, and other photographers will be scratching their heads, wondering and asking, “How did you do that?”
Side Note: Finding The Right Model
I am often asked how I go about finding models and how much I pay. Many of my models are simply friends and friends of friends, and friends of friends of friends, and sometimes family. Every once in a while I will find models through sites like ModelMayhem. Sometimes they find me. Sometimes I find them while standing in line at the coffee shop (people love hearing they ought to be in pictures). The question of compensation is a broad one, but I always try to compensate the models in some way, even if they are close friends. If I am contacted by a model looking for portfolio work, then I will do photos for trade (also referred to as TFP/CD .. “Time For Print or CD”) – they get images for their modeling portfolio; I get a model release. If I am hiring a model for something very specific I am looking for, then I will pay anywhere from $40 to $150 per hour.. depending on the experience level of the model and my confidence in their “look”. The most I have ever paid a model is $187.50 per hour (yes, it’s an odd hourly figure, but it was the rate I was presented with), and that was for a seasoned professional who strictly made their living from modeling and acting. Basically, everyone needs something. At the very least, they want to feel appreciated. Compensation does not always have to be money. It can be prints or a CD, pizza and beer, trade for other services.. like shooting a wedding, or even kind words and a heart-felt “Thank You.”… if it’s family.
Not So Much WHAT as HOW
“Should I focus on photographing people or stills?”
The best answer I can give is to pick your passion and stick with it. Some people shoot food, some shoot conceptual stills, some landscapes or cityscapes, while others focus on people. My personal preference is photographing people, since I simply enjoy the interaction and experience with various personalities (it keeps things interesting for me). There are challenges with every type of photography, especially if you are trying to capture images that appeal to the world of advertising. No matter what (or who) I am photographing, I always ask myself, “How might this be used?” If I can’t imagine the shot in a printed ad or on a web site, I’ll re-think and re-arrange the shot until it looks useful.. or I’ll simply scrap the idea and move on. As I mentioned earlier, the best way to develop an eye for what a useful shot looks like, just browse the magazine rack at your local book store or supermarket and pay close attention to subject matter, text placement, color schemes, etc. Also, pay very close attention to the cleanliness of the shots!
Details, Details.
Pay attention to the details. Here are some of the things I obsess over when shooting a model:
Type of clothing for the theme
Color coordination
Accessories – watches, ties, scarves, rings, hair bands, etc
Grooming & Neatness – hair, makeup, fingernails, clean/wrinkle-free/lint-free clothing
Concealment of tattoos (unless they are the focus of the shot)
Background – either white (isolated) or complementary to the shot as a whole
* Lighting
Amateur shots are easy to spot, because they are usually taken hastily without having paid attention to the details. Buyers are usually looking for professional-looking photos. Professional ad designers can spot the difference between professional and amateur photos a mile away. Competition is fierce, so I can’t stress enough how important it is to pay attention to the details!
One often forgotten detail is the background. Many photographers are so focused on what is going on in the foreground that they forget to pay attention to what is going on in the background. This is a personal pet peeve of mine. A crummy background can easily ruin what might have been the “perfect shot”. For example, taking a photo of an attractive person in front of a clear blue sky… add a few power lines in the background to completely ruin the shot. Or how about a shot of a person hiking in a remote, pristine wilderness… with a partial view of a portable lavatory and overflowing trash can in the background. Or a beautiful young lady dancing on a hill of green grass with clear blue skies… and a little league baseball diamond in the distance. At the very least, these annoyances should be removed in post processing. Even better – pay attention to what you are photographing in the first place. The background helps tie the whole scene together and ultimately helps build the story and mood of what is going on in the foreground. Think of foreground and background together as Yin and Yang.
* Lighting is a subject all its own, which cannot easily be summed up in a couple of paragraphs. So I’m saving that for next time!
Help Me Help You!

 Latest iStock Uploads by Justin Horrocks (jhorrocks)
- An error has occurred; the feed is probably down. Try again later.

You must be logged in to post a comment.